

Getting your streaming video on to the internet and your website can seem a daunting task...especially when your ISP sticks you with a dynamic IP instead of a static One. Some ISP's (Information Service Providers) dont make it easy for you either as the "FREE ROUTER" some of them supply you with may not have a DYNDNS section in an attempt to force you into buying a static IP address instead of using a free or very low cost DNS service.
The very simplest and easiest way to get your live cameras streaming on the Internet is to use our webcam hosting and streaming service with one of our great Plug and Play IP camera which automatically connects to our servers when you you plug it in, so again no router programming is necessary. But if you want to do it yourself and avoid the low monthly charge of only £2.99 then read on and we will show you all the steps you need to take.
We are going to start talking lots of numbers and terminology now which is unavoidable, so to try and keep things clear in your head, think of what we are trying to do as sending a letter. Its not a perfect analogy but it will do for this example. In order to get the letter to the right person we have to use an address. We have to know the Country, City, area, road or street, house number and name of the person. When the letter arrives at the post office the postman looks at the local address details and then can deliver it to the recipient.
To access a camera over the internet without using our webcam hosting service, we need to know the Internet IP address of the router and the port number that we are forwarding to, then when the request for a picture arrives at the router, the router needs to know what local IP address, subnet mask and default gateway settings to deliver the request for a picture to.
Your current public IP address, the one that your ISP is broadcasting is shown on the top bar of this page above the search box. If you have a static IP address then this number will not change. However most domestic and some commercial broadband services dont provide a static IP address unless you pay for it separately. If its not a static IP then its called a Dynamic IP address. This number could change at any time and will almost definetly change if the router or modem is powered off and on again. Dynamic IP addresses are allocated by the ISP so you have no control over them. For now you can use this number to set things up and test, and check if its changed by just returning to this page. We can sort this problem later when everything else is working.
For connecting cameras and other equipment to the internet you need a spare network socket on your router for each new device. You can always expand the number of sockets by adding a 4 to 1 ethernet switch or even bigger. This will connect to 1 spare port on your router and give you 4 or more extra inputs. If you only currently have 1 computer and this is connected to a broadband modem then you will need to purchase a router. These are easy to add to broadband modems and usually work straight out of the box.
Now on your local network, that is the devices in your premises connected to your router, each device will have its own IP address. Each computer, camera, DVR or Network Printer must have a different IP address so the router can route data to them properly. Think of the router as the post office that the mail has now come in to. The router has to look at the data and know where to deliver it. Usually all the devices on a routers local network also have dynamic IP addresses. This is fine normally as your sending requests out from the router to ask for information e.g downloading programs or viewing web pages etc. But for data coming in, the router must know where it has to go. So what we do is set the camera to a fixed IP address on the local network. To do this first we need to know what the IP range is and what some other numbers are too. You can do this two ways, either log on to your router and get the details from the settings there or you can get a pretty good idea of all you need to know by opening a DOS window on your PC then typing in IPCONFIG and pressing return. This will show you the computers current settings. What we need are 3 x sets of numbers.
(1) The IP address of the computer - so we can guess the range. (2) The Subnet Mask (3) The Default Gateway.
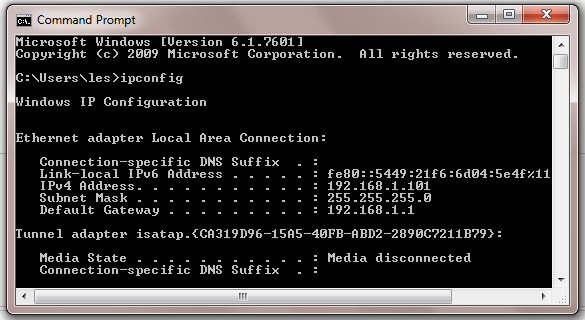
As you can see here for our example, the IP address ends in 6 and the subnet mask and default gateway are clearly visible too.
Now write these down for reference. The mask and gateway we will need to go into our camera and these two are the same for all devices.
On our system the router IP ends in 1 and all the other devices follow on up from that so there are at least 5 devices including this computer connected at present.
We know now that we arent going to have many more so we could set the IP address in our camera to end in 10 and still have room for 3 more before it and the rest after it (up to 254) so for our example we will set the camera's IP address to end in 10.
So now we go into the cameras configuration settings and set the IP address type to fixed or static.
Next we will set the manual IP address in the camera to 192.168.1.10. Then we set the subnet mask to 255.255.255.0. The we set the default gateway to 192.168.1.1 While we are here we can set the port number for the camera too. This is like our City in our letter posting scenario. There is only 1 country to worry about - the one we are in (our router) but there can be many Cities. So our port number we will set at 8888 (we are using this as its one of the many ports not used for anything specific on a router). So all the programming in our camera will be as follows: IP 192.168.1.10, Mask 255.255.255.0, Gateway 192.168.1.1, Port 8888.
To check this works locally you should log on to the camera by typing the IP address and the port number into your browser like this. http://192.168.1.10:8888 If all is well the camera picture will appear.
OK so thats great we have our local address all set up and we can see it on our PC (the post man in the post office in the city knows where to deliver the letters he gets). But now we have to get the letters first into the country (the router) then to the post office in the city (the port) and this is done in the router. The router will have a great feature which can be called a number of things depending on the make of the router unfortunately. It can be called Port Forwarding, Network Address Translation (NAT) Pinholes, Game and Application Sharing plus many more. It all boils down to the same thing. When a call comes into the router from the Internet on the Internet public IP address followed by a port number, the router knows which IP address on the local network to forward the data to.
Now you will have to look at your routers manual and instructions for the details on how to do this for a particular router. There is also a good site call Port Forward.com which has lots of information to help with specific routers which may help you too. What you do is go into the router settings, then forward your camera port to the local IP address of the camera. So in our example, tell the router to forward port 8888 to 192.168.1.10. Thats it. Now look at the IP address this web page is reporting to you ( at the top on the right hand side above the search bar) this is your current Internet Public IP address. If you get someone using a different connection, e.g. call a friend, to type in that address followed by the port number into their browser, the browser should call the router, the router will see the call is on port 8888 and will know exactly where to forward the call for a picture to. Then the person calling in will see the video feed.
For example if your public IP is reported as 212.10.12.10, you would type in http://212.10.12.10:8888 that call for a video feed comes into the router which knows that 8888 has to go to 192.168.1.10 and forwards it accordingly and the feed starts.
If you need to set up more cameras, you simply do all the same as above, but use a different port number and local IP for each camera, then to access them from the Internet you type in the same Internet IP address for each camera, followed by the different port number for each camera.
When all this is done and working, all will be well - until your ISP changes your Dynamic IP address. You can soon get it going again by simply logging on here and finding out the new public address - but that will get to be a real pain after a while. Two solutions to this, either pay your ISP for a static IP, OR use a FREE DNS forwarding service. These are great as you get a name instead of an IP to remember and the name never changes, you program the account information into the router then when ever the router detects an IP change, it updates the name.
For more information on this feature see the Dynamic DNS Information section and check out Portforward.com if your having trouble setting up your router.

